
Digital wallets such as MetaMask, xDeFi or even Frame, are essential to interact with the world of cryptocurrencies, especially decentralized finance (DeFi). But these browser extensions are also highly susceptible to hacking. Here are 7 best practices to follow, which, if not completely eliminate this risk, will best protect you from the potential theft of your assets.
Basic precautions to protect your cryptocurrency wallet
Connecting your digital wallet to a physical wallet
If you use wallets like MetaMask, you are the owners of your private keys, this is called non-custodial wallets. This has one major advantage and one major disadvantage:
- Advantage: you are solely responsible for your cryptocurrencies;
- Disadvantage: you are solely responsible for your cryptocurrencies.
This dose of irony is actually meant to make you think about all that is involved. Of course, you don’t have to answer to anyone, and that’s one of the beauties of our ecosystem. But if you make the slightest mistake, there is no customer service to make up for it.
The first and most important tip is to use a hardware wallet alongside your digital wallets. These can be purchased for around 60 euros for the simplest models to several hundred for the most sophisticated.
When your cryptocurrency capital starts to grow, do not neglect this investment. Indeed, we have had proof again some time ago that wallets that work as browser extensions are not entirely secure.
Most digital wallets offer a “Connect hardware wallet” function. This will allow you to use them with a Ledger or Trezor key, to name but a few.
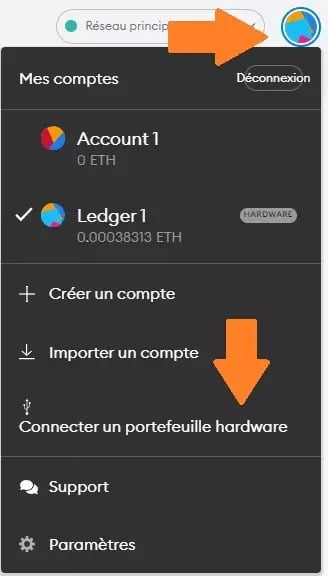
Figure 1: Connecting a hardware wallet to MetaMask
The strength of these tools lies in the fact that even if someone takes control of your computer remotely, they will not be able to perform transactions. Indeed, it will be necessary to carry out a physical validation of this transaction directly from the connected hardware wallet.
Of course, you should not save any private key, phrase or recovery file on your computer for any address. And that includes a hardware wallet, such behaviour would make about as much sense as putting your credit card in your Facebook profile picture.
Retrieving a platform link from CoinGecko or CoinMarketCap
When visiting a protocol for the first time, choose to access it through CoinGecko or CoinMarketCap. This will definitely give you the right address rather than a fraudulent link found via your search engine. Unless CoinGecko or CoinMarketCap have been hacked themselves, but that’s a different matter…
You can then save this link in your favourites for future use and/or use the automatic entry in your search bar to get to the right address.
A variation of this method is to use the official Twitter of the protocol in question. Make sure that the account has the “verified” logo so that you don’t get trapped by a fake profile.
This last recommendation is also valid for browser wallets as shown in the illustration below. Indeed, the first result of our search “MetaMask Wallet” is an advert redirecting to a fake MetaMask site, as indicated by the URL with an extra “A” and the wrong domain (.co instead of .io). If you enter your recovery phrase on this one, you can be sure to kiss your cryptocurrencies goodbye.
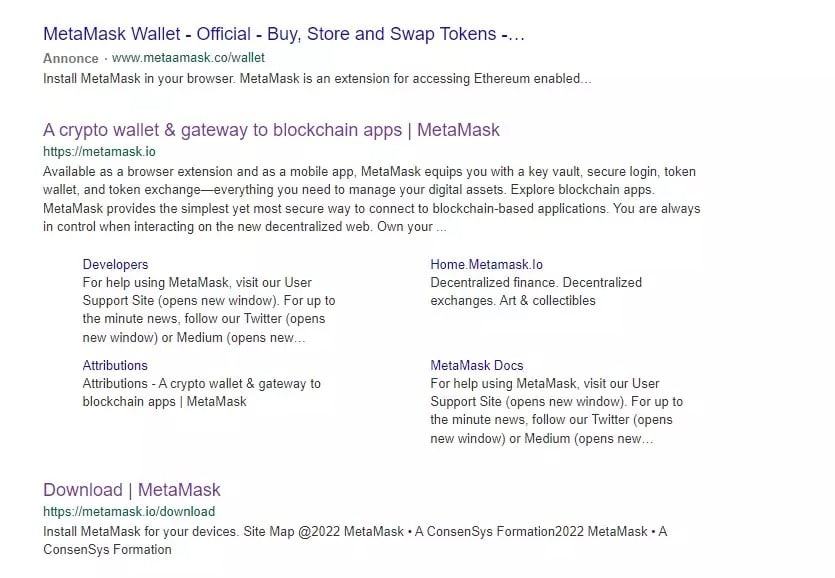
Figure 2: Fraudulent ad in first MetaMask search result
The real address of MetaMask is metamask.io, not metamaask, or .com, or other variants. The same goes for xDeFi, Frame, Keplr or Phantom to name a few, which are often affected in such spoofs.
Seeking out phishing attempts
The mechanics here are simple: they will play on your emotions in order to trap you. In this case, it is often fear that is used, as with this fraudulent email posing as an official message from MetaMask
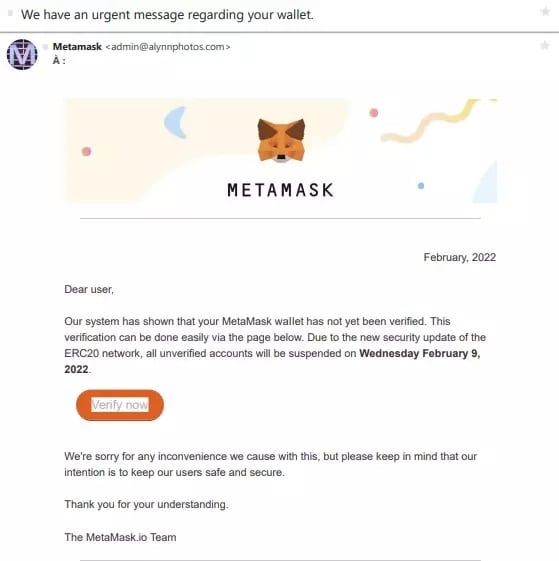
Figure 3: Attempted phishing with a pseudo-email from MetaMask
According to what is written, security actions are supposed to be carried out. However, if you copy and paste the address on the button, you can see that it does not point to the official MetaMask website. The aim is once again to steal private keys.
Assume that if there really is a security breach, the project teams will not send you emails, they will communicate directly on their official social networks like Twitter.
Besides, think about it, how, outside of KYC, could decentralised applications have your email address in their database when it is not needed to use their services?
On a more general note, but still in the same spirit, be particularly vigilant on social networks such as Discord and even more so with Telegram. Fake project channels are numerous and it becomes very easy to be fooled by being redirected to a scam
Don’t touch tokens out of nowhere
When we look at our addresses on blockchain browsers, we all have tokens in our wallets that we don’t know where they came from.
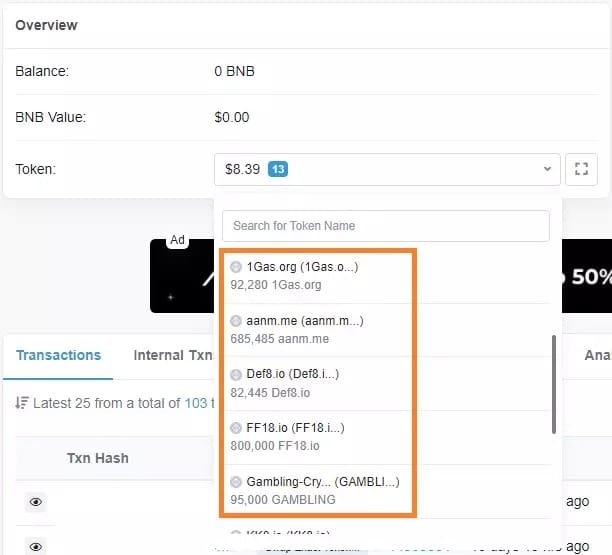
Figure 4: Example of scam tokens on the BSC
The instruction is simple: don’t touch it. These tokens may or may not have a so-called value, but often they all have the same purpose: to siphon off your account.
In this type of scam, ill-intentioned people will randomly send a token to multiple addresses in the hope that someone will try to sell it.
The future victim will then seek to swap the token in question into a more conventional asset such as ETH for example. This will be done either from a decentralised exchange or from the “project site”. In both cases, it will unknowingly allow a smart contract to empty its account.
The token in question may even have a name similar to a more famous cryptocurrency in order to be confusing. Just keep in mind that if you are not somehow responsible for a token arriving at your address, then it is probably a scam.
To add to these precautions, avoid handling your cryptocurrencies when you are not in an optimal emotional state. Even the most experienced among us can fall into simple traps due to fatigue, stress or inattention. Now let’s look at some even more advanced precautions that will help you to avoid as many risks as possible.
Additional precautions
Manage your portfolio permissions
When you interact with a smart contract, you must authorise it to spend your tokens. To illustrate this, imagine you want to add liquidity to the ETH-USDT pool on the decentralised exchange of your choice. You will need to give 3 permissions:
- One for your ETH;
- One for your USDT;
- One for the resulting LP token to make it yield.
These approvals are often symbolised by the ‘Unlock’ or ‘Approve’ button, as in the example below where TUSD must be unlocked before it can be exchanged for MATIC:
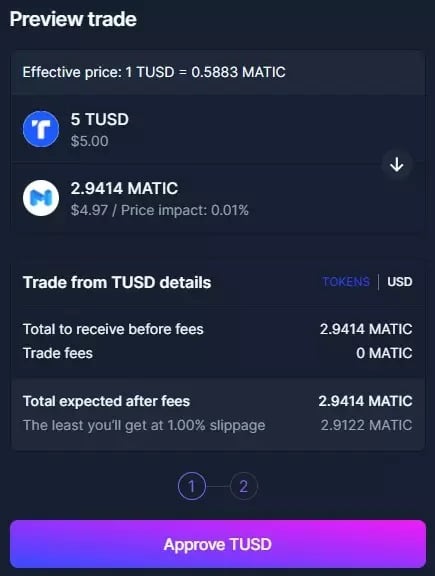
Figure 5: Unlocking TUSD on Balancer
In this example, by clicking on “Approve TUSD”, 99% of people sign up for unlimited authorisations.
The danger of this practice arises if the protocol gets hacked or has some kind of problem. Consider here that if you give Balancer unlimited permission to spend your TUSD, a problem with the smart contract in question puts ALL the TUSD in your wallet at risk on the network where it resides.
The following screenshot shows you a list of all the permissions given by assets on an address as well as the amount of token exposed on the Polygon network.
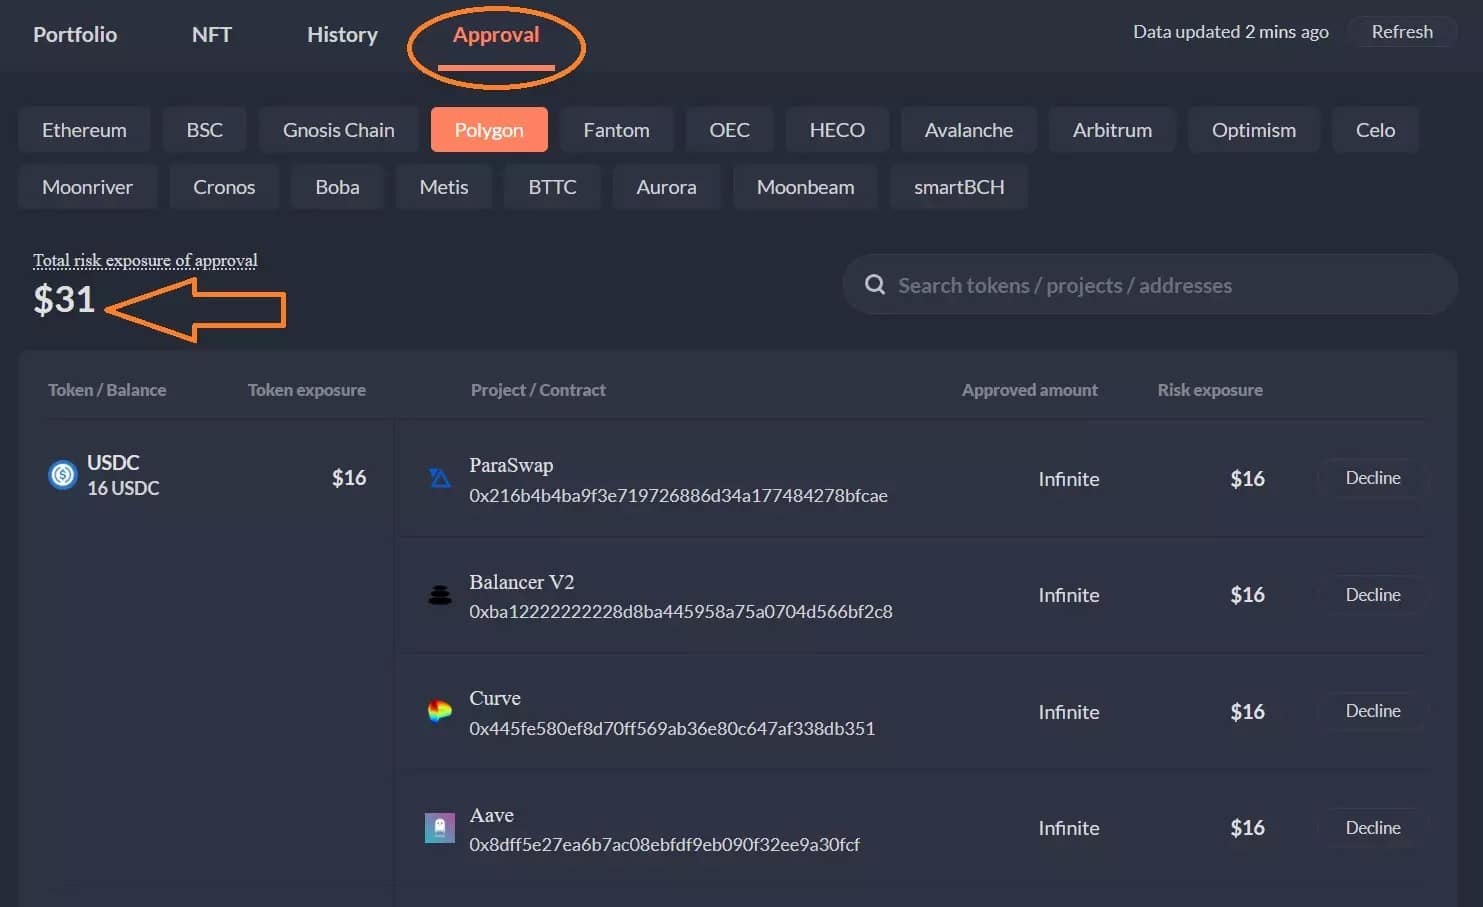
Figure 6: Permissions given to smart contracts on the Polygon network
The $31 in the example represents the total value of the portfolio exposed to authorisations. You can also see that the 16 USDC at this address have active authorization on 4 different protocols.
The authorisations in question are infinite, which means that the potential consequences remain the same, no matter how much is in the account: all USDC on the address on the Polygon network are exposed in case of failure of one of the 4 smart contracts. So if you send 1000 USDC on this address, it will be 1016 USDC that could be stolen if the smart contract authorised on Curve was hacked.
You can find your different detailed authorisations on the different Ethereum Virtual Machine (EVM) compatible networks by connecting your wallet to the DeBank website and going to the “Approval” tab. To remove an approval, you need to click on “Decline”.
A variation is to go directly to the “Token Approvals” tab on the blockchain browser of the network in question, in this case PolygonScan:
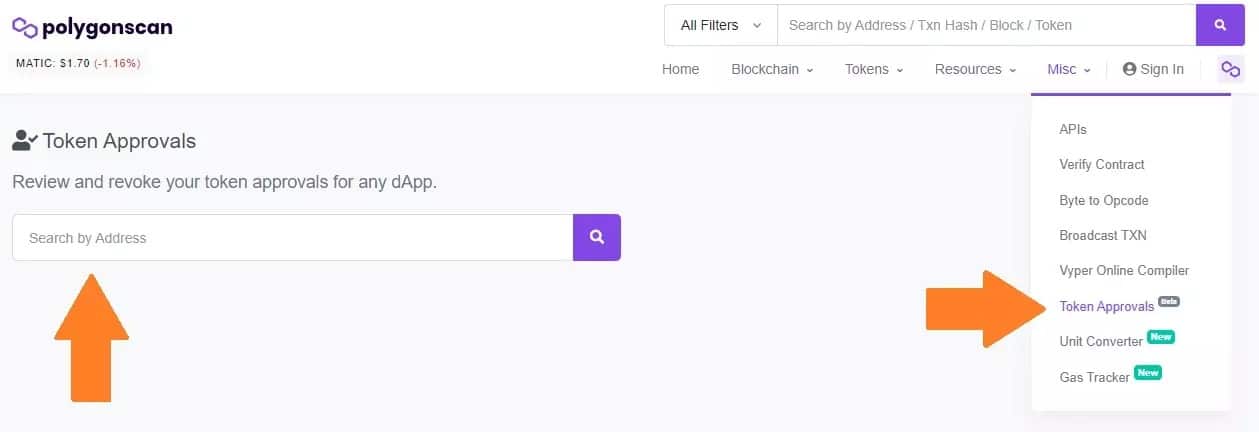
Figure 7: The Token Approvals menu on PolygonScan
The logic remains the same on the different EVM compatible blockchain browsers. Go to your address using the search bar, then connect using the “Connect to Web3” button. This will show you all the permissions you have granted
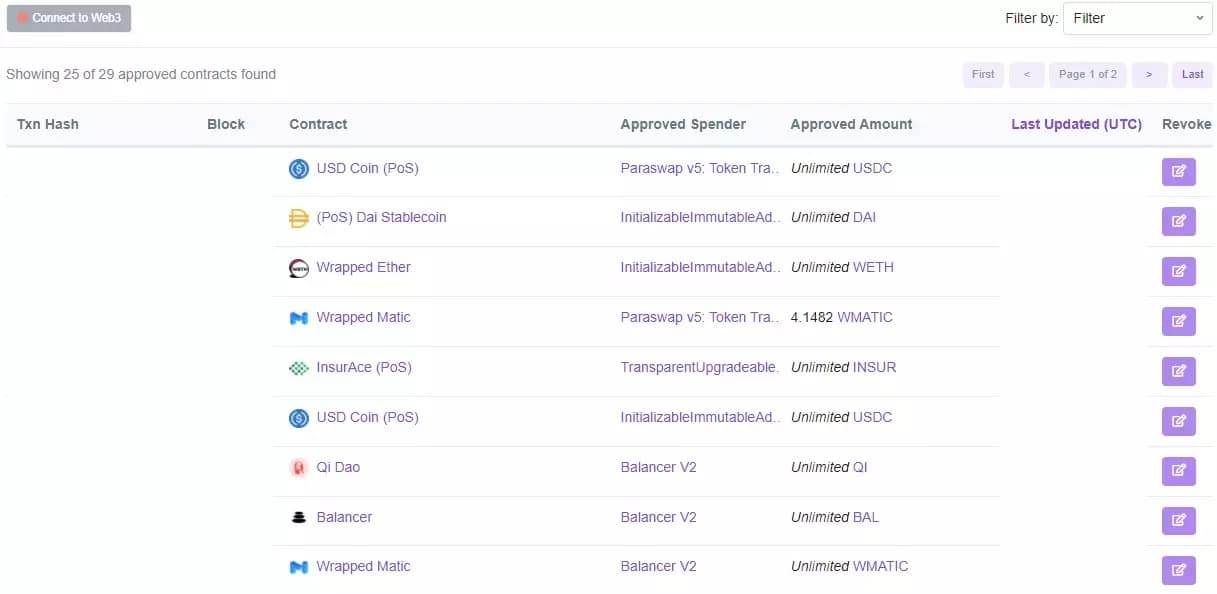
Figure 8: View of the different permissions of an address on PolygonScan
The “Revoke” option on the right allows you to remove an authorization. Be aware, however, that whether you use this method or the DeBank method, each revoke requires a transaction. If the cost is not significant on the Polygon network, it is quite different on Ethereum. It is then up to you to define whether or not it is in your financial interest to delete an authorisation according to the capital exposed.
The other possibility is not to grant infinite authorizations, but authorizations limited to the amount of cryptocurrency you want to use in your operation:
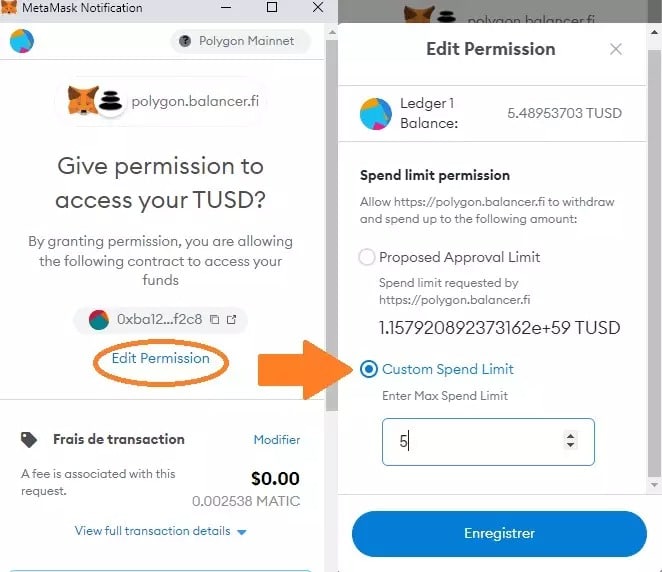
Figure 9: Customizing an authorization via MetaMask
When approving a smart contract for example with MetaMask, click on “Edit Permission” before validating the transaction. You will see that by default the “Proposed Approval Limit” option is checked and that it represents an almost unlimited amount of tokens. By choosing “Custom Spend Limit” instead, you can enter only the funds needed for the transaction, keeping the rest of your capital safe.
Keep in mind, however, that these authorization management operations are not without constraints. For if you cancel an authorisation, you will have to give it back to put assets back into the contract, and the same is true if you give a limited authorisation.
As mentioned earlier, these methods can have limitations on the Ethereum network if your capital size is limited. There are no right or wrong answers, it is up to you to judge the trade-off between flexibility, cost and risk, and to bear the possible consequences of each option.
Having a hardware wallet theoretically protects you from the risk of smart contract authorisation. But what is true at a given moment will not necessarily be true indefinitely, which is why it is still necessary to pay attention.
Furthermore, if a protocol is hacked, your LP Tokens may well be safe on your address, but no longer worth anything, because the underlying has been emptied into the liquidity pool of the defaulted application. This is why it is also necessary to do some research upstream to eliminate questionable protocols.
Verifying a smart contract with blockchain explorers
If you go back to the screenshot that allows you to see approved smart contracts from a blockchain explorer, you will see a “Contract” column. Let’s take the case of the USDC, you can make sure the smart contract is verified by clicking on it, there should be this little green mark in the appropriate tab:
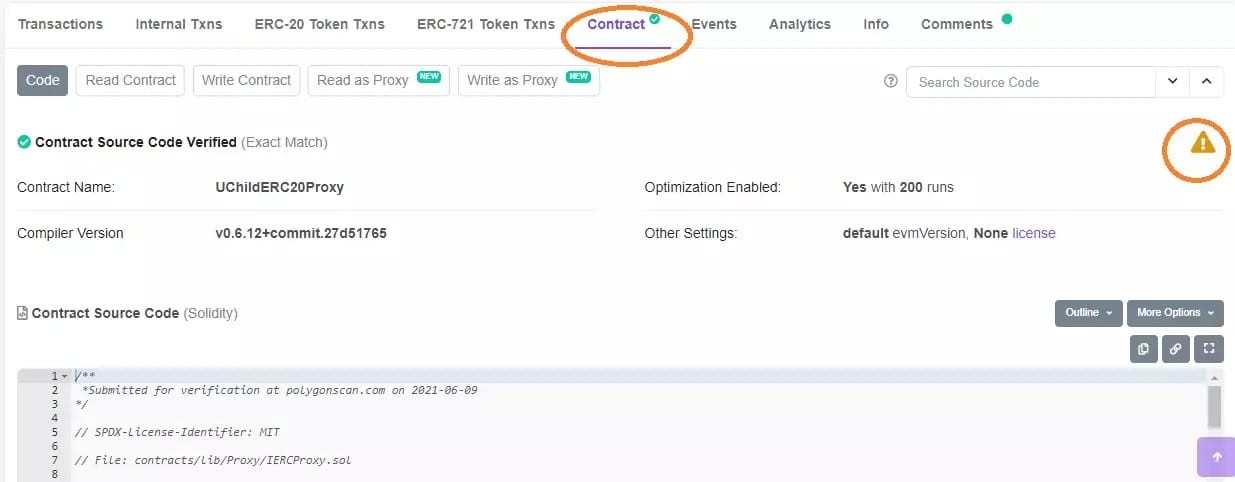
Figure 10: Paraswap’s smart contract for the USDC on Polygon
The small “Warning” logo will also allow you to see what bugs have been found, but this part will only make sense to the more technical among you. This lists the possible flaws, their level of severity and a summary of the possible consequences that may be caused:
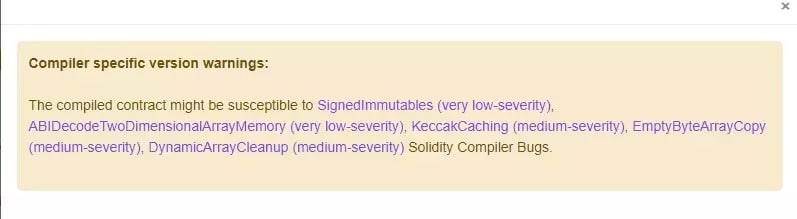
Figure 11: Lists of potential vulnerabilities in the Paraswap USDC smart contract
You will also be able to access the page of a smart contract directly before signing the authorization of it. Click once on the address of the contract from MetaMask, then a second time in the box to the right of the page you will be redirected to. This will take you to the same point as the USDC example to do the necessary checks:
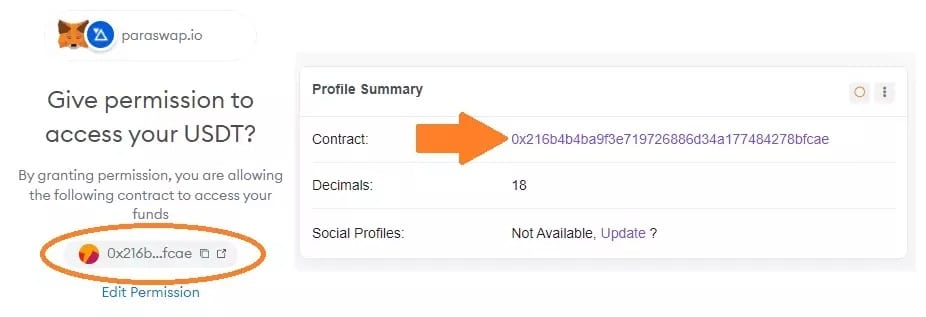
Figure 12: Checking a smart contract before signing
This is typically the kind of small habit that can protect you from certain types of hacks as was the case in the OpenSea phishing attack.
Consult audits and potential hacking history
The first thing to check before interacting with a DeFi protocol, for example, is whether it has already been hacked. For this, the rekt.news website provides a not very gratifying classification, also informing you on the method used to exploit the flaw through detailed articles available in French. Then find out if the flaw has been fixed.
Secondly, find out about the protocol’s smart contract audits.
Generally, the projects refer you to their GitBook from their home page (that of their “showcase” website, not their application), look for a “Doc” or “Documentation” tab there. Taking the Aave protocol as an example, if you search for “Audit” in the search bar, you will have access to all the smart contract audits of the platform.
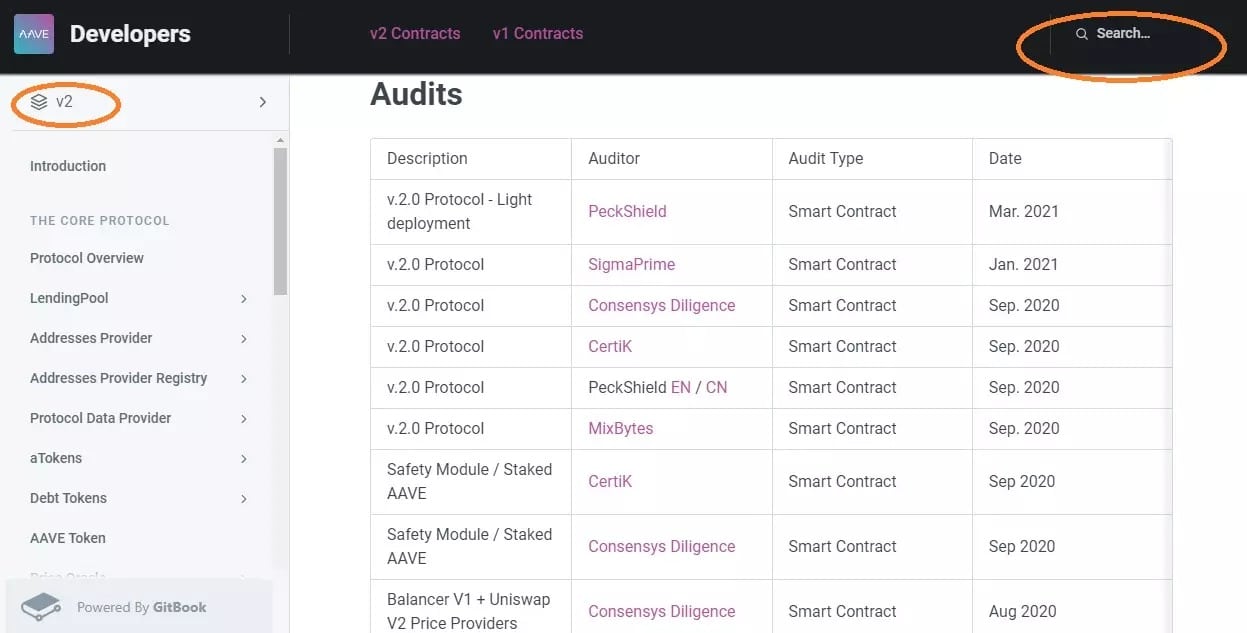
Figure 13: List of Aave V2 smart contract audits
In this case, if you click on the PeckShield audit, for example, you will be directed to Github and will see that it has revealed two items in the “Informational” category, i.e. they do not represent any particular danger.
Errors or other irregularities are generally classified in this way, in descending order of severity:
- Criticism;
- High;
- Medium;
- Low;
- Informational.
An audit may be complicated to read for a novice. But if you read even a summary of what was found, the dangers it may involve and any corrective actions that were taken by the team, then you will have done more than 99% of the people.
Keep two things in mind though, firstly, not all smart contract auditing companies are equal, for some it is enough to ‘write the cheque’ to gain certification.
The purpose of this guide is not to be a whistleblower, but without naming names, you can go to Twitter and type “” + the name of a particular company specialising in the field. Look at what kind of projects are boasting of being audited by this one. When you see a lot of shitcoins in a short period of time, this can give you an indication.
Secondly, no matter how serious an auditing company is, it can only rely on past experience. You can never be sure that a talented hacker will find a flaw that no one else has thought of.
That said, a project audited by several companies for the same smart contract will still be a guarantee of seriousness, if these entities are themselves audited.
If you cannot find the information on the project’s website, you are free to ask the founders directly. If the team is serious, they will be honest with you about the progress of the audits and will have no interest in “drowning out the fish” by trying to lull you to sleep with fine words.
Conclusion on the security of your digital portfolio
Despite all this advice, keep in mind that no one is safe from a hack or other scam. Anyone who claims otherwise will be ruined.
Beyond the technical flaws, human gullibility is often the weakest link in the equation. That said, while there is no such thing as zero risk, by following a series of best practices like those outlined in this guide, it will be possible to limit this risk to some extent and navigate the complex ecosystem that is cryptocurrencies and the blockchain more serenely.